Back to Contents Page
Operating the Monitor
Dell™ U2410 Flat Panel Monitor User's Guide
 Using the Front
Panel Controls
Using the Front
Panel Controls
Using
the On-Screen Display (OSD) Menu
Setting
the Maximum Resolution
Using
the Dell Soundbar (Optional)
Using the Tilt, Swivel and Vertical Extension
 Rotating the monitor
Adjusting the Rotation Display Settings of Your System
Use the buttons on the front of the monitor to adjust the image
settings. 1~5 are capacitive touch sensor keys, activated by placing the finger on the Blue LED button.
|

|
|
1-3 |
Shortcut keys
|
Use this key for
direct access to the control menu that you define in the personalize menu.
For example, use the second shortcut key to activate Brightness/Contrast adjustment.

*The
default settings are Preset Modes Select, Brightness/Contrast Select and Input
Source Select.
|
|
1 |
Preset Modes Select |
Use this button to select different image modes on your monitor. |
|
2 |

Brightness/Contrast
|
Use this button for direct access to the
"Brightness/Contrast" control menu. |
|
3 |
Input Source Select |
Use
Input Source Select button to select between different
video signals that may be connected to your monitor.
- VGA input
- DVI-D 1 input
- DVI-D 2 input
- DisplayPort
input
- HDMI
input
- Component
video input
- Composite video input
Displays the source selection bar.
Touch  and
and
 buttons
to move between the setting options
and Touch buttons
to move between the setting options
and Touch  to select the input source you want.

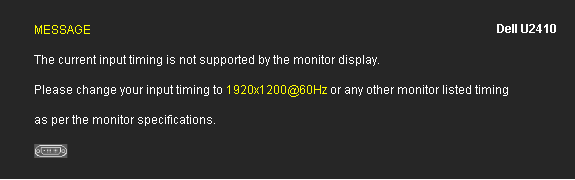
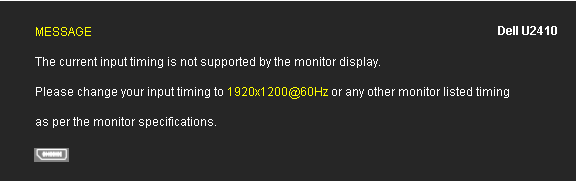
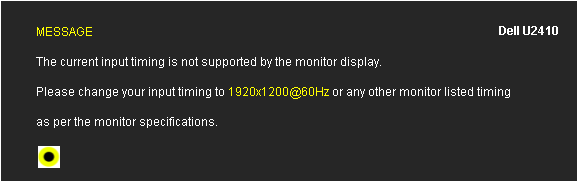
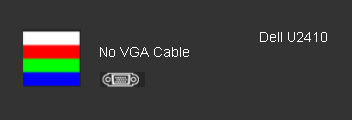
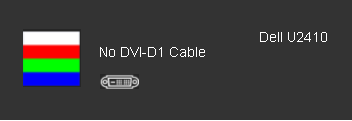
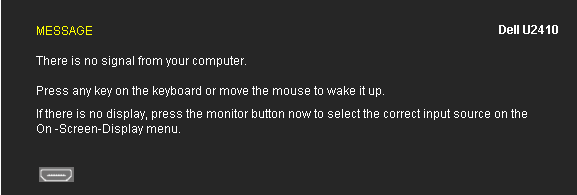
If VGA or DVI-D or DisplayPort or HDMI input is
selected and all VGA and DVI-D and DisplayPort and HDMI cables are not connected, a floating dialog box
as shown below appears.
or

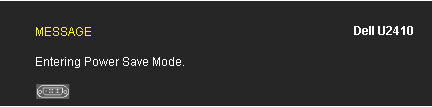
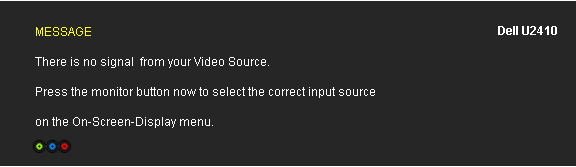
If either Composite, or Component input is selected and the cables are
not connected or the video source is turned off, the screen does not have
an image. If any button is Touched (except power button), the monitor
displays the following message:
 |
|
|
or |
|
 |
|
|
|
4 |

OSD Menu
|
Use this key to open the on-screen
display (OSD). See
Using the OSD Menu. |
|
5 |

Exit
|
Use this key to exit the OSD menu. |
|
6 |
 Power button
(with power light indicator) |
Use the power button to turn the monitor on and off.
The Blue LED indicates the monitor is on and fully functional. An amber LED indicates DPMS power save mode.
|
 |
NOTE: If you change
the settings and then either proceed to another menu, or exit the OSD menu, the
monitor automatically saves the changes. The changes are also saved if you
change the settings and then wait for the OSD
menu
to disappear. |
1.
Touch to
launch the OSD menu and display the main menu.
Main
Menu for Analog (VGA) Input

Or
Main
Menu for non Analog (non VGA) Input

|
|
NOTE: Auto Adjust is only available when you are using the analog
(VGA) connector.
|
2. Touch the
and
buttons to move between the setting
options. As you move from one icon to another, the option name is highlighted. See
the table for a complete list of all the options available for the monitor.
3. Touch the
button once to activate the highlighted option.
4. Touch
and
button to select the desired parameter.
5. Touch
to enter the slide bar and then use the and
buttons, according to the indicators on the menu, to make
your changes.
6. Touch  return to the main menu or
to exit the OSD
menu.
return to the main menu or
to exit the OSD
menu.
|
Icon
|
Menu and Submenus
|
Description
|
|
|
|
Brightness/Contrast
|
| |
|
Brightness |
|
Contrast |
|
Back |
|
|
Allows you to
adjust the brightness and contrast. |
|
|
Brightness adjusts the luminance of the backlight.
Touch the
button to increase brightness and Touch the
button to decrease
brightness (min 0 ~ max 100).
|
|
Adjust Brightness first, and then adjust Contrast only if further
adjustment is necessary.
Touch
the
button to increase contrast
and
Touch the
button to decrease contrast (min 0 ~ max 100).
The Contrast function adjusts the degree of difference between the
darkest and lightest areas on the monitor screen. |
|
Touch
to go
back to the main menu.
|
|
|

|
Auto Adjust
|
Even though your computer
recognizes your monitor on startup, the Auto Adjustment function optimizes
the display settings for use with your particular setup.


|
NOTE: In most cases, Auto
Adjust produces the best image for your configuration. This option is only
available when you are using the analog (VGA) connector.
|
|
|
|
|
Input Source
|
| |
|
Scan Sources |
|
VGA
|
|
DVI-D 1 & 2 |
| DisplayPort |
| HDMI |
|
Component |
|
Composite |
| Back |
|
|
The Input Source menu is to select between different
video signals that may be connected to your monitor. |
 |
|
Scan for Sources, touch
to
scan for available input signals. |
|
Select VGA input when
you are using the analog (VGA) connector. Touch
to
select the VGA input source. |
|
Select DVI-D input when
you are using the Digital (DVI) connector. Touch
to
select the DVI input source. |
|
Select DisplayPort
input when you are using DisplayPort connector.
Touch
to
select the DisplayPort input source. |
|
Select HDMI input
when you are using HDMI connector.
Touch
to
select the HDMI input source. |
|
Select Component input
when you are using component video connector.
Touch
to
select the component input source. |
|
Select Composite input
when you are using composite video connector.
Touch
to
select the composite input source. |
| Touch
to go
back to the main menu. |
|
|
|
|
Color
Settings
|
| |
|
|
|
Input
Color Format |
|
Gamma |
|
Mode
Selection |
|
Preset
modes |
|
VGA/DVI-D1/
DVD-D2/HDMI/DP input |
|
Standard |
|
Multimedia
|
|
Game
|
|
Warm
|
|
Cool
|
|
Adobe RGB
|
|
sRGB
|
|
Custom
Color
|
|
Video
input |
|
Movie |
|
Game |
|
Nature |
xvMode |
|
Hue |
|
Saturation |
|
Reset
Color Settings |
|
Back |
|
| Allows you to set the image mode and color
format. |
|
Image mode submenu for VGA/DVI-D input(when DVI-D input, Auto Adjust is non-available) |
|
Image mode submenu
for Video input |
|

|
or
|

|
| NOTE:
Image
modes are different between the VGA/DVI-D and Video inputs. |
| Choose the RGB option if monitor is connected to a computer or a DVD using a VGA or DVI cable. Choose the YPbPr option if monitor is connected to a DVD by a YPbPr to VGA or YPbPr to DVI cable or if the DVD color output setting is not RGB. |
| Allows you to set
the color mode to PC or MAC. |
| Allows you to set
the display mode to Graphics or Video. If your computer is connected to your monitor, choose Graphics. If
a DVD, STB, or VCR is connected to your monitor, choose Video. |
|
|
|
|
|
Mode suitable for desktop applications. |
|
Mode for multimedia applications, eg video playback. |
|
Mode suitable for gaming applications. Use this mode for minimal input lag. |
|
Select warm mode to
obtain a red tint. This color setting is typically used for
color-intensive applications (photograph image editing, multimedia,
movies, etc.). |
|
Select cool mode to
obtain a bluish tint. This color setting is typically used for text based
applications (spreadsheets, programming, text editors, etc.). |
|
This mode is compatible
with Adobe RGB (96 % coverage).
|
|
Emulates 72 % NTSC
color. |
|
This mode allows users to have full control of the monitor's advance 6-axis color adjustments.

Use the
or button to select the Gain, Offset, Hue, Saturation.
Gain: Select it to adjust input RGB signal gain level (default value are 100).
Offset: Select it to adjust RGB black-level offset value (default value are 50) to control your monitor base color.
Hue: Select it to adjust RGBCMY hue value individually.
Saturation: Select it to adjust RGBCMY saturation value individually.
|
|
Image mode submenu for Video input
|
| Mode suitable for movie playback. |
| Mode suitable for game applications. |
|
Mode suitable for nature
scenes. |
| Mode suitable for xvYCC compliance source. |
|
This feature can make the
video image color shift from green to purple. Use this feature to adjust the
skin tone. Use
or button to adjust the hue from '0' to '100'.
increases the green hue in the image
increases the purple hue in the image
|
NOTE:
Hue adjustment is only available for video input.
|
|
|
Allows
you to adjust the color saturation of the video image. Use
or
button to adjust the saturation from '0' to '100'
makes video image looks monochrome
makes video image looks colorful
|
NOTE:
Saturation adjustment is only available for video input.
|
|
|
Returns your monitor color settings to those that were set at the time of
manufacture. |
Touch
to go
back to the main menu. |
|
|
|
|
Display
Settings
|
| |
|
Wide Mode
|
|
Horizontal
Position
|
|
Vertical
Position
|
|
Sharpness
|
Noise Reduction |
|
Zoom
|
|
Pixel Clock
|
|
Phase
|
|
Dynamic
Contrast
|
|
Display Info
|
|
Reset Display Settings
|
|
Back |
|
|
Use the Display Settings to adjust image.
|
 |
|
Adjusts the image ratio as 1:1, Aspect or full
screen.
NOTE:
Wide Mode adjustment is not required at optimal preset resolution 1920 x 1200.
|
|
Use
the
and
buttons to adjust image left and right. Minimum is '0' (-).
Maximum is '100' (+).
|
|
Use
the
and
buttons to adjust image up and down. Minimum is '0' (-).
Maximum is '100' (+). |
|
This feature can make the image look sharper or softer. Use
or to adjust the sharpness
from '0' to '100' .
|
Improve the motion picture quality by reducing noise on image edge.
|
|
Use the Zoom function to zoom in
to specific area of interest.
Using the
and keys
to zoom in and out.
|
|
The Phase and
Pixel Clock adjustments allow you to adjust your monitor to your
preference.
Use
the
and
buttons to
adjust
for best image quality.
|
|
If
satisfactory results are not obtained using the Phase adjustment, use the
Pixel Clock (coarse) adjustment and then use Phase (fine), again.
|
NOTE:
Pixel Clock and Phase
Adjustments are only available for "VGA" input.
|
|
|
Allows you
to increase the level of contrast to provide sharper and more
detailed image quality. |
|
Displays the monitor's
current settings. |
|
Select this option to restore default display settings. |
|
Touch
to go
back to the main menu. |
|
|
|
|
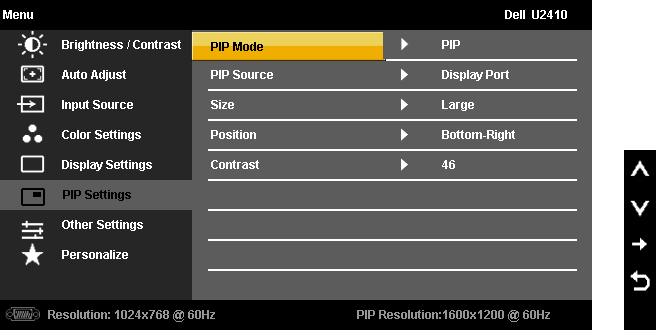
PIP Settings
|
| |
| |
| |
| |
|
PIP Mode
|
|
When
PIP/PBP activated |
|
PIP Source
|
|
Size
|
|
Position
|
|
Contrast
|
|
Hue |
|
Saturation
|
|
Back |
|
|
|
|
|
Other Settings
|
| |
|
Language
|
|
Menu Transparency
|
|
Menu Timer
|
|
Menu Lock
|
Menu Rotation |
|
Button Sound
|
|
Power Save Audio
|
|
DDC/CI
|
|
LCD
Conditioning
|
|
Factory Reset
|
|
Back
|
|
| Select this option to adjust the settings of the OSD, such as, the languages of the OSD, the amount of time the menu remains on screen, and so on. |
 |
| Language option to set the OSD
display to one of eight languages (English, Espanol, Francais, Deutsch,
Japanese,Brazilian Portuguese,Simplified Chinese,Russian). |
|
Allows you
to adjust the OSD background from opaque to
transparent.
|
|
OSD
Hold Time: Sets the length of time the OSD will remain active after the last
time you Touched a button.
Use
the and
buttons
to adjust the slider in 5 second increments, from 5 to 60 seconds.
|
|
Controls user access to adjustments. When lock, no user adjustments are allowed. All buttons are locked. To unlock, touch the Exit button (located above power button) for 15 sec.

|
NOTE:
Menu lock can also be activated by touching the Exit button (located above power button) for 15 sec. Touch the Exit button for 15 sec to unlock.
|
|
Rotates the OSD by 90 degrees counter-clockwise. Your can adjust the menu according to your rotating your monitor.
NOTE: Menu Rotation is not available when PIP/PBP is on. |
|
The
monitor beeps everytime a new option is selected in the menu. This button
enables or disables the sound.
|
|
Turns
the Audio Power on or off during power save mode.
|
DDC/CI (Display Data Channel/Command Interface) allows your monitor
parameters (brightness, color balance etc) to be adjustable via software
on your PC. You can disable this feature by selecting "Disable".
Enable this feature for best user experience and optimum performance of
your monitor.

|
| If an image
appears to be stuck on the monitor, select LCD Conditioning to
help eliminate any image retention. Using the LCD Conditioning feature
may take several hours. Severe cases of image retention are known as
burn-in, the LCD Conditioning feature does not remove burn-in.


|
| Reset all OSD settings to the factory preset values. |
|
Touch
to go
back to the main menu. |
|
|

|
Personalize
|
There are
three shortcut keys on the front panel. Select one control menu for each
shortcut key to allow direct access.

|
|
|
If you Touch any button other than the power button one of the following
messages will appear depending on the selected input: |
|
VGA/DVI-D/HDMI/DisplayPort input |
 |
or |
 |
 |
or |
 |
|
Video Input |
| |
or |
|
|
|
|
|
|
|
NOTE: When there is no valid input signal and the monitor is switch off and on, any active PIP/PBP window will disappear. Please
enter PIP/PBP submenu to bring back the
PIP/PBP window.
|
See Solving Problems for more information.
- Right-click on the desktop and select Properties.
- Select the Settings tab.
- Set the screen resolution to 1920 x 1200.
- Click OK.
If you do not see 1920 x 1200 as an option, you may
need to update your graphics driver. Depending on your computer, complete one of
the following procedures.
If you have a Dell desktop or portable computer:
- Go to support.dell.com, enter your service
tag, and download the latest driver for your graphics card.
If you are using a non-Dell computer (portable or
desktop):
- Go to the support site for your computer and download
the latest graphic drivers.
- Go to your graphics card website and download the
latest graphic drivers.
The Dell Soundbar is a stereo two channel system adaptable to mount on Dell flat
panel displays. The
Soundbar has a rotary volume and on/off control to adjust the overall system level, a blue LED for power indication, and two audio headset jacks.

| 1 |
Attach Mechanism |
| 2 |
Headphone Jacks |
| 3 |
Power Indicator |
| 4 |
Power/Volume Control
|
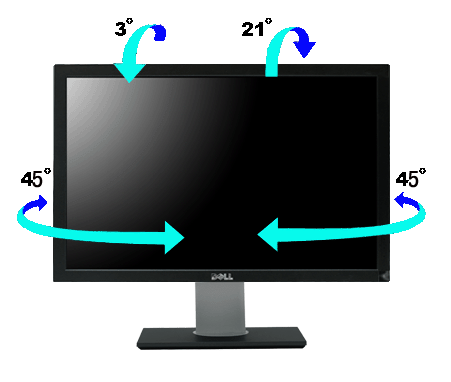
With the built-in pedestal, you can tilt and/or swivel the monitor for the most comfortable viewing angle.
|
NOTE: Stand is NOT attached when the monitor is shipped from the factory.
|
Stand extends vertically up to 100 mm + 5 mm.

Rotating the Monitor
Before you rotate the monitor, your monitor should be fully vertically extended (Vertical Extension) and fully tilted (Tilt) up to avoid hitting the bottom edge of the monitor.


 |
NOTE: To use the Display Rotation function (Landscape versus Portrait view) with your Dell computer, you require an updated graphics driver that is not included with this monitor. To download the graphics driver, go to support.dell.com and see the Download section for Video Drivers for latest driver updates.
|
|
NOTE: When in Portrait View Mode, you may experience performance degradation in graphic-intensive applications (3D Gaming etc.).
When in Portrait View Mode, PIP/PBP is not available.
|
Adjusting the Rotation Display Settings of Your System
After you have rotated your monitor, you need to complete the procedure below to adjust the Rotation Display Settings of Your System.
|
NOTE: If you are using the monitor with a non-Dell computer, you need to go the graphics driver website or your computer manufacturer website for information on rotating the 'contents' on your display. |
To adjust the Rotation Display Settings:
- Right-click on the desktop and click Properties.
- Select the Settings tab and click Advanced.
- If you have an ATI graphics card, select the Rotation tab and set the preferred rotation.
If you have an nVidia graphics card, click the nVidia tab, in the left-hand column select NVRotate, and then select the preferred rotation.
If you have an Intel graphics card, select the Intel graphics tab, click Graphic Properties, select the Rotation tab, and then set the preferred rotation.
|
NOTE: If you do not see the rotation option or it is not working correctly, go to support.dell.com and download the latest driver for your graphics card. |
Back to Contents Page